Saturday, October 6, 2007

Baby Leg Warmers - Part 2

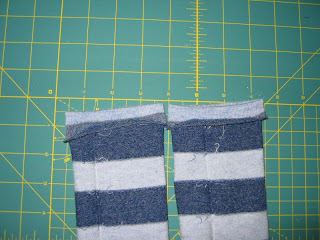
Take a safety pin and poke it through your elastic and close it. Take the safety pin and insert it into the open slit you just made. Feed it around until it comes out the other side.

Then pull out the elastic far enough to fold it on top of one another and straight stitch back and forth to join the two ends of the elastic together.


Then feed them back into the "ditch" you made for it and join the open edges of the sock and straight stitch across that 1/2 inch gap to close it up.

That's all - you are finished. You can vary this by just zig-zaging the bottom edge too to give a lettuce edge finish.

Have fun with these.

Baby Leg Warmers

Here are the instructions I use to make the baby leg warmers from a pair of woman's knee socks.

Basically, cut them off just below the start of the curve (one inch below) then turn the socks inside out.


Fold the end so it is on the inside of the sock (side that is facing you now) starting at the fold lay your elastic down and "mark" where the elastic ends.


This is where you will sew your straight line. Sew a straight stitch all the way around (be sure not to sew the socks together as you are working in a circle) leaving a 1/2 inch area open and un-sewn.

Instructions will continue in the next post.

Friday, July 13, 2007

Placemat Purse - part 2

7. To stabilize the bag a little more I make a base - this also covers the bottom seams. Use a heavy interfacing like ultrafirm. Trace the bottom of the bag & cut out the piece. 8. Test fit in the bottom of the bag and trim if necessary.
9. Cut a coordinating fabric big enough to wrap around the interfacing.
10. Fold the fabric around the interfacing. I fold so that there are on raw edges. I fold the sides in first then the top and bottom. Sew the side seams using a zigzag stitch. Place in the bottom of the bag.
You are finished!
You can get as creative as you want. You could use beads for straps, bamboo rings, premade handles, ribbons, etc... I used a ribbon closure on the one in the photo above - you can use ribbon, Velcro, buttons, snaps, magnetic snap, etc...

Enjoy!

Placemat Purse - part 1

Here is a quick project that can give the impression you spent a lot of time on it. Placemats make great purses. I started with a fun placemat I purchased on clearance.

1. Fold the placemat in half and cut 2" squares out of the folded corners.
2. Turn the placemat right sides together and sew the side seams.
3. Then line up side & bottom and sew the bottom seams.

4. Turn right side out.
5. Determine what kind of straps you would like. For a simple strap just cut coordinating fabric twice the width plus seam allowance as wide as you would like the straps and whatever lenght you would like the straps. Fold lengthwise and sew right sides together. Turn right side out and press. Most of the time I will topstitch the straps - but it is not necessary. Once your straps are ready it is time to attach them to the bag.

6. I like a clean line - so I use a seam ripper and open up the top of the bag where I would like my straps. Slip the straps in and topstitch. I do about 3 lines of stitching to reinforce the straps. You can also just add the straps to the inside of the bag without opening the seam - it is your preference.
I will continue this in the next post.

Thursday, May 10, 2007

T-Shirt Dress

My daughter has been living this these "princess" dresses lately. I have made so many lately and have been asked how to make them - so I thought I would share.

Materials:
T-shirt or onesie
1/2 - 1 yard of fabric for the skirt

First decide where you would like the skirt to start (natural waist or empire waist). Then cut off the appropriate amount off the bottom of the t-shirt. You can also do this with a onesie - just don't cut off the bottom.
Next, decide how long you would like the skirt. Also, depending on your child, how full you would like the skirt. My daughter insists on having a very spiny skirt.
For the case of the very spiny skirt cut 2 lengths of the fabric. Sew a seam on one side. Then make a tight ruffle from the fabric making it the same length as the bottom of the shirt.
Otherwise you can cut 1 length of the fabric. Gather or ruffle the fabric to be the length as the bottom of the shirt.

Next with right sides together and the bottom of the skirt toward the top of the shirt, pin the skirt to the shirt. Now, sew a seam connecting the skirt to the shirt. I usually use a stretch stitch. Then I go back and overlock to prevent fraying.

Finish the bottom hem of the dress and then you are done.
You can add an applique or embellish the top of the dress if you so desire. I would love to see photos if you make a dress.

Wednesday, May 9, 2007

Welcome

Hello,

I am Kate. This blog has been created to be able to share some sewing instructions. I have been asked how to make some of the projects I have posted in forums I frequent. So enjoy and I hope you learn something.

Thanks for stopping by,
Kate